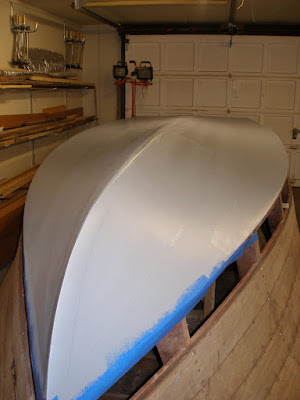
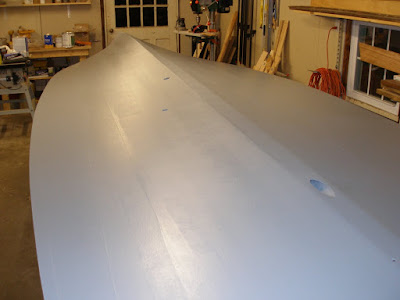
Now it's on with 2 coats of Pettit Hard Racing Copper Bronze paint. Which I hear is an "animal" all of it's own. Report to follow.
Wednesday, December 7, 2011
Primed.
Moving a long quite nice. I have three of the four coats of Interlux 2000E primer down. According to the instructions, I must put down the 1st. coat of the bottom paint with in 7 and 9 hours after the 4th. coat to get the required bond between them. Not sure how critical this is, but I'm taking no chances. I don't want to be in position to do paint the bottom again because of blistering.
Wednesday, November 30, 2011
Putty up!
I am pretty happy with the fairing and sanding of the bottom. After using the 8" Dewalt sander, I went over the entire bottom with a 16" long flexible longboard with 80 grit paper to get out the low spots. Then on to putty and fill the 1500+ screw holes. I used Famowood # 1 wood filler, as recommended by "the book". Though I think the DAP solvent based wood filler they sell at Home Depot works the same. For what I know, it's probably the same stuff.
For the larger bolt holes, I used Smith's Fill-It, a epoxy based wood filler that will not shrink and dries overnight.
After the wood filler dried overnight, I went over with my 5" orbital sander. Then back out for two coats of Smith's CPES. Now it looks like a spotted trout, as said by someone else.
If the mild weather hold a few more days, I may be able to lay a few coats of the Interlux 2000E primer before winter sets in. It is workable down to 41ºF (5ºC). Painting with the Copper Bronze paint must wait until spring.
Saturday, November 26, 2011
Out in fresh air.
The hull is out of the shop for the first time is 2 1/2 years. Initial sanding is to be done on the bottom, and want to do that outside. A lot of dust is generated and want to avoid the cleanup.
Initial sanding with my DeWalt variable speed sander with 8" soft pad. 80 grit paper is used.
Looking pretty good.
I have to reset about 50 screws that are not drilled deep enough, and then fill all the screw holes with Famowood No. 1 wood filler. Final sanding by hand with a long board before sealing with CPES and Interlux 2000E primer.
Monday, November 21, 2011
5200 bottom.
I finally have a 5200 bottom, but not much more boat than that. Finished "gluing" down the bottom planks with 3M5200, and installed the 1550 (or so) screw that the original bottom had.
It is messy work, but will ensure the longevity of the bottom for the next 50+ years, that's the claim anyway. "Time will show.."
It took 30 tubes of 5200 to cover the bottom with a 3/16" V-trowel.
I will let the 5200 cure for a short week, put the wheels on again and take the hull outside for initial sanding. It create a lot of dust, and I rather do that out in the drive way.
Monday, November 14, 2011
Planked out!
After a week of steam bending, sizing, cutting and hand planing I have all the planks for the bottom just right. It came out pretty good. It was somewhat hard to get the a nice even fit over the length of the boat. Was able to keep all seams inside 1/16" (1.5 mm) wide. The gap will be filled with 3M5200 during final assembly. Plank No. 1, 2, 4 and 5 are full length boards, and No. 3 is split 1/2 way.
The center lines for the frames are marked with different colors, from the marks in the keel and chine. Want to distinguish the different frames because of the different screw sizes. Main- and auxiliary frames (black and green) takes a #8 x 1 3/4" screw and the intermittent frames (red) takes a #8 x 1" screw. Also marked the where not to put a screw.
Once the planks have dried for a week or so, it's time to take the planks off again, seal with CPES and permanently install with 3M5200.
Wednesday, November 9, 2011
Ahh, the smell of wood.
The shop is smelling like freshly cut Philippine Mahogany again. It's been a long four month "sabbatical". I've been rough cutting the bottom planks, and steam bending to take some of the stress out. This will make installing planks without help a little easier.
Note to self: Pre-fit and steam planks before inner layer is installed........
Once they cool overnight, fitting and adjustment is done. Since both the keel and the stem is new, the old garboard planks (closest plank to the keel) are not good enough for for accurate tracing.
Nice fit, after a final adjustment with a block plane.
One pair down, 4 more to go....
Friday, October 14, 2011
Goodies from Al.
The last of the missing hardware is now in house. After hours of scouting eBay and calling used parts dealers, I bitt the bullet and ordered them from California Classic Boat and Al Schinnerer. He has done the research over the last 30 + years so you can be sure you get the correct piece. And they come show ready with new chrome.
The new pieces are ignition (with correct bezel), hatch handles, flagpole with globe light, trim rings for the lift rings, and trim ring for the exhaust at the transom. And new hull number and prop plates.
And then to the steering wheel... The wife had a strange look on her face when I said I needed a $1100 steering wheel.
I've been looking all over for a used 17" 3-spoke wheel. In my research I found out it is the same at used in 1936-37 Plymouth trucks. I called half a dozen antique Mopar parts dealers, without any luck. Found some one on eBay selling NOS wheels, they where "backlite" brown in color and at a $750 "buy it now". Still had to use many hours on getting it painted black, and probably with mixed results. The seller never return my question to confirm the diameter of the center recess either. Several fellow woodies-guys had old ones for sale, most in very bad shape and with a groove or two on the rim (which is said to be incorrect). Also the countless hours I had to spend repairing with epoxy putty and painting, with uncertain results.
Wednesday, August 17, 2011
Screwed.
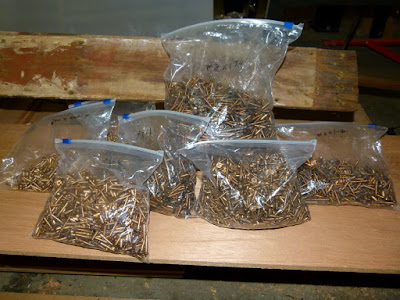
Not much time to work on the boat, I'm sorry to say. But I'm still gathering the needed parts and pieces. With regards to the needed silicon bronze wood screws, a pro boat restorer here in New England recommended Goulet Specialties in Winsted CT. Their prices are on par with the known "restoration box stores", but according to the the pro's, these screws have a better tensile strength and don't "snap" or break as easy. No fancy packaging, just zip-lock bags. These screws are made here in the US, and their website have videos of the manufacturing process.
I can't wait until all these 4700 screws are in.....
After some siding work on the house and replacing my patio door, I'm ready to finish up the bottom on the boat.
Wednesday, June 22, 2011
It's the small details.
With information from the Buzz, CCABC's forum, I was able to get my hands on a correct pre-war fuel tank for about the same price as a new Rayco aluminum tank. It has the rolled lip that was used in the past and made with galvanized steel, 16" diameter and 33 gallon capacity. Modernized with a topside fuel pick-up. This tank has the fuel gauge sender which needs to be capped for use in my boat.
Currently painted GarWood green for a project that didn't materialize. Not 100% sure if this tank is restored or a new reproduction by Kinch's Radiator in CA, but it has their tag on it. If it's restored, it is in excellent, as new shape. According to their website, they restore and manufacture radiators, fuel tanks etc.
I have started the work on the bottom planking. Pictures and stories to follow soon.
Friday, May 20, 2011
Sweeet lines...
There it is, the inner bottom in place. Glued, screwed, un-screwed, sanded fair and sealed with CPES. A nice smooth surface to attach the outer planking with 3M5200 without air pockets where water can seep in and cause rot problems down the road. No shortcuts.
I just love the changing shape/lines around the bow.
Now it's time to start on the fitting the planks.
Monday, May 16, 2011
A lot of work.
Getting close to finish laying the inner bottom layer. Puh, lot of work though. It takes a good 20-30 minutes per board laying the bottom this way. Fitting the piece, bedding with 5200, get all those screws in, and finally cleaning up the 5200 squeeze out. I understand why most use sheets of plywood, both for labor and cost. I don't regret one bit though, that I'm doing it this way. Once I get the boat upright, I will see the grain direction the original way.
Another 3 hour of work and I'm done. Once the 5200 sets, one final fairing and the sealing with CPES. Then on to fitting the bottom planks.
Friday, April 29, 2011
Bottom up!
With the help from fellow woodyboaters, I now believe I have the right shade of red for my bilge. Time has finally come to start on the bottom. As mentioned before, I'll use use solid Philippine instead of plywood for my boat. The 3/16" x 6" is properly sealed with CPES, and I'm bedding them in 5200 to the frames and between the boards. I'm using #6 x 5/8" sheet metal screw to hold everything in place until the 5200 sets.
I have only done a few boards so far, but I'm happy with how it's going. Installing the intermittent battens is a breeze, since they are steam bent into shape. And no need to send someone into the hull holding while you screw from the outside. The boards go on at a 45 dgr. angle, so you simply mark you spacing, and screw the battens inn as you go. Cleaning up the 5200 is also easy, though not less messy, since you can reach in.
If you work by your self, I think I can recommend this approach over full 8' length of plywood. Though probably a little more time consuming.
Friday, April 15, 2011
Shades of Red.
This issue is driving me crazy! I have samples of 3 different "know" Chris Craft bilge paints, and the one I think is the best match, No. 3, is considered the correct for postwar Chris Crafts. And No. 2 is commonly known as the match for prewar boats (#2301 Farmhouse by Sherwin Williams). Yeah, I know, the paint on my old hull is 70 years old and probably faded as such, but still...
Thursday, April 14, 2011
Going diagonal.
As mentioned earlier, I'm going to use 3/16" thick mahogany in stead of plywood for my inner bottom. Other restorers, both pros and amateurs alike, have said to me in a friendly way that's too much work, you will regret not using plywood. On the other hand, the purists have given me high fives and bear hugs when I mentioned traditional planking.
I've put a lot of thought into both options. Though more work, I believe properly sealed and properly bedded with 5200, the traditional diagonal bottom is just as good as plywood. And it's going to look a hole lot better. You can "score" diagonal lines in the plywood as much as you want, but you will still see the grain going the length of the boat under the paint.
The Woodery in Lunenburg MA, re-saw and planed some 1" x 6" Philippine down to 3/16" for me. It is now sealed with CPES and drying in the early spring sun.
It's somewhat a shame that it's going to be painted sort of "barn house red" bilge color.
Wednesday, April 13, 2011
Steaming again.
Between the frames there are 20 pcs. 9/16 x 7/8" battens on each side on the boat. Cut these out of White Oak and getting the seam generator and steam box ready.
After the Oak has been "cooking" for 30 minutes, I used the boat as a jig to achieve the correct curve on the battens.
With the inevitable spring back when steam bending wood, the battens will have the correct shape of the bottom after drying. I'm marking the correct length before removing the clamps. Once dried, I'll seal them with CPES.
Monday, April 11, 2011
Back at it!
With the warmer temperatures, I'm back at it. Took the chines off after drying over the winter and sealed them with CPES, and permanently re-assembled them with 3M5200.
Time has come to address the shaft hole though the keel. Got the old strut wire brushed, and ordered a new cutless bearing and strut bolts from Classic Boat Connection. With a Google search I learned that the easiest way to remove the old bearing is to carefully use a hacksaw to cut down the length of the bearing. Then it's easy to use a screwdriver to "peal" it out.
Taking measurements from the old keel for correct placement of the rudder and strut.
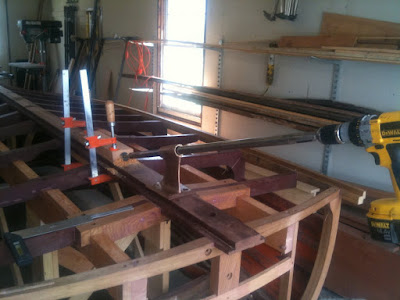
With the help from a 80 year old machinist in the neighborhood, he modified my old shaft onto a extended Forstner bit. The shaft is ready for replacement regardless, and this way I can drill the 1 3/8" diameter hole through the keel accurately with the strut as the guide.
Next thing to-do, making and steam bending the 9/16" x 7/8" bottom battens.
Subscribe to:
Comments (Atom)
